Dyson Stick Vacuum Plastic Scuff Removal - Restoring ABS Housing
📑 Table of Contents
The Visible Toll of Daily Use
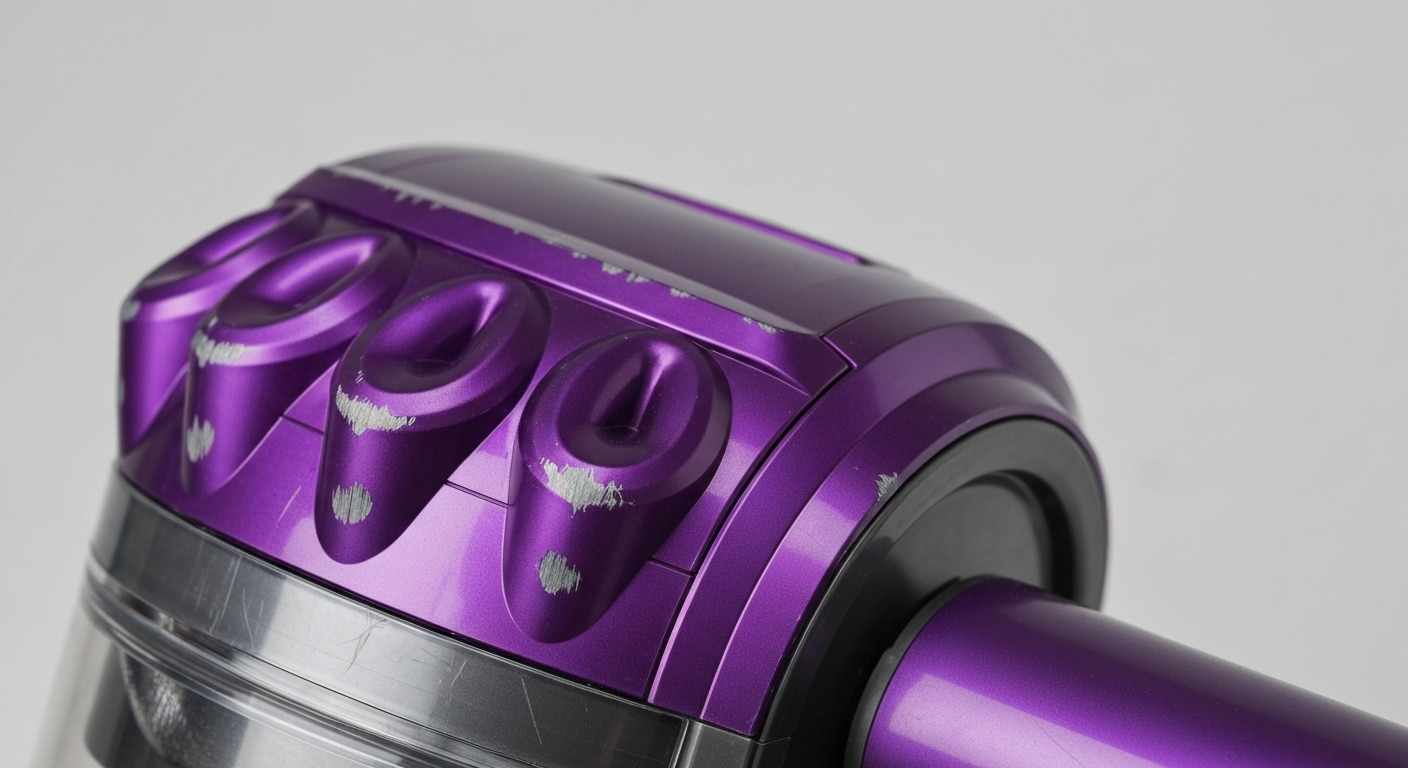
Section titled “The Visible Toll of Daily Use”A Dyson stick vacuum takes hits every week, door frames, chair legs, baseboards, and storage mounts. The machine can run perfectly while the glossy housing starts looking like it has been dragged behind a truck.
This guide is Dyson-specific and focused on high-impact ABS housings and the clear polycarbonate bin. The methods here aim for controlled material removal, so you restore gloss without creating permanent haze.
How to Remove Scuff Marks from a Dyson Vacuum (Quick Answer)
Section titled “How to Remove Scuff Marks from a Dyson Vacuum (Quick Answer)”- Wash first with mild dish soap and warm water, dry with a clean microfiber.
- Remove paint transfer with 70% to 91% isopropyl alcohol on microfiber, no hard rubbing.
- Polish scuffs with Novus No. 2 by hand, light pressure, keep the cloth moving.
- Only step up to Novus No. 3 if No. 2 cannot reduce the scratch, then refine back with No. 2.
- Finish with Novus No. 1 (or a plastic-safe protectant) and reduce static with a dryer sheet wipe.
High-Impact ABS Durability
Section titled “High-Impact ABS Durability”Acrylonitrile butadiene styrene, usually called ABS, is the main structural polymer in many Dyson housings. It is used because it survives impacts that would crack brittle plastics, not because it is the most scratch-resistant option.
ABS is a blend system. Acrylonitrile brings chemical resistance and heat stability, butadiene is the rubber phase that takes impact, and styrene adds rigidity and helps with that high-gloss, premium-looking surface.
That rubber-toughened structure is the catch. The same impact modification that stops cracking also makes the surface easier to scuff, especially in glossy finishes where tiny surface disruptions show up as bright, obvious marks.
Why Dyson Plastic Scuffs Easily
Section titled “Why Dyson Plastic Scuffs Easily”The housing is constantly brushing harder materials. Painted trim, metal chair legs, tile edges, stone transitions, and even grit on a microfiber can mark ABS.
A lot of “scuffs” are not actually missing plastic. They are transfer marks, meaning paint, rubber, or metal oxidation stuck to the surface, which is why proper cleaning and solvent choice often beats aggressive abrasion.
Docking stations and tight storage spots also concentrate wear at the same contact points. If the vacuum clicks into a mount with a slight rub each time, you get repeat scuffing in a perfect line.
Scratches vs Structural Cracks (Photo Guidance + Safety Decision Tree)
Section titled “Scratches vs Structural Cracks (Photo Guidance + Safety Decision Tree)”Before you polish anything, figure out whether you are looking at surface disruption or a true crack; this is especially important when cleaning household plastics, such as when cleaning and maintaining Dyson vacuum plastics without damage. Polishing a crack does nothing for strength, and it can hide a defect you should be monitoring.
Use hard, directional light and change viewing angle. A scuff will “flash” and change as you move the light, a crack tends to stay visible from nearly every angle because it is a fracture plane, not just surface texture.
Do the flashlight transmission test in a dark room. Put a bright flashlight inside or behind the plastic section, then look from the outside, a through-crack will leak light.
Scuff vs Crack Identification Table
Section titled “Scuff vs Crack Identification Table”| Check | Surface scuff or scratch | Structural crack |
|---|---|---|
| Angle test under bright light | Changes, fades, or flashes with angle | Line stays consistent with angle |
| Fingernail test | Nail may catch lightly or not at all | Nail often “drops” into a defined line |
| Flashlight transmission | No light passes through | Light leaks as a bright line or dot |
| Dust behavior over time | No change | Dust may seep through, line may lengthen |
| What to do | Clean, then polish | Repair, monitor, or replace part |
Safety decision tree
Section titled “Safety decision tree”If it fails the flashlight test, treat it as structural. If the crack is in a load-bearing joint, latch area, or near the motor housing, replace the part or get Dyson service.
If it is a short hairline away from stress points and no air leakage is present, you can monitor it and avoid stressing that section. If the crack is spreading, stop using that component and replace it.
If you need ABS bonding guidance for actual fractures, this article stays cosmetic-focused, but the same material behavior applies as discussed in ABS plastic.
Common Mistakes That Permanently Damage Dyson Plastic
Section titled “Common Mistakes That Permanently Damage Dyson Plastic”Most damage I see in the shop is self-inflicted during “quick cleaning.” ABS and polycarbonate do not forgive the wrong abrasive or chemical, especially on glossy finishes.
Avoid overusing melamine foam (Magic Eraser) on any visible exterior panel. It micro-sands the surface, leaving permanent dull patches that you cannot “clean back to glossy,” you can only polish surrounding areas down to match.
Stay away from automotive cutting compounds and heavy rubbing compounds unless you understand abrasive grade and pad control. Many car compounds are designed for clearcoat hardness and will haze plastic fast, then you end up chasing your tail with finer polishes.
Do not use ammonia glass cleaners on the clear bin or cyclone shroud. Ammonia can craze polycarbonate, creating a cloudy, spiderwebbed look that is permanent.
Avoid strong degreasers, acetone, lacquer thinner, and citrus solvents on housings. They can swell ABS, soften edges, and leave a glossy “melted” patch that looks worse than a scuff.
Method: Magic Eraser Warning (Why It Fails on Dyson Gloss)
Section titled “Method: Magic Eraser Warning (Why It Fails on Dyson Gloss)”Melamine foam works by abrasion, not magic. On tile or glass, it cleans without visible harm because those materials are harder than the foam’s abrasive structure.
On ABS and polycarbonate, melamine removes the scuff and the finish at the same time. The result is a flat, dull spot that catches light differently than the surrounding panel, and that contrast is what your eye locks onto.
If you already dulled an area with melamine, you can sometimes blend it back by polishing a wider area with a proper plastic polish. You will not get the original factory gloss if you cut through the outer finish unevenly.
Using Novus No. 2 Polish (When to Use No. 3, When Not To)
Section titled “Using Novus No. 2 Polish (When to Use No. 3, When Not To)”Novus is a solid, predictable system because the abrasives are sized for plastics, not paint. No. 2 is the main tool for Dyson scuffs, it cuts fine marks while keeping risk manageable.
No. 3 is for deeper scratches, and it is easy to overuse. If a scratch barely catches a fingernail, start with No. 2, do multiple passes, and only escalate to No. 3 if you are not seeing reduction after several controlled cycles.
The reason is simple, deeper abrasives leave their own haze pattern. On glossy ABS, you then must refine that haze with No. 2, and if you rush the refinement you end up with a “polished but cloudy” patch.
Practical technique that avoids halos
Section titled “Practical technique that avoids halos”Work clean, any grit on your cloth becomes uncontrolled sanding. Put a pea-sized amount on microfiber, polish a small section (about 6 inches by 6 inches), then wipe, inspect, and repeat.
Keep pressure light to moderate and keep the cloth moving in overlapping circles, then finish each set with straight strokes to even out the scratch pattern. If the residue turns tacky, you have worked it long enough, stop and wipe, then decide whether to do another pass.
On edges and corners, back off pressure. Thin plastic and sharp radii heat up and distort quicker than flat panels.
Plastic Polish Comparison: Novus vs Polywatch vs Generic Compounds
Section titled “Plastic Polish Comparison: Novus vs Polywatch vs Generic Compounds”Dyson housings are mostly ABS, while the clear bin is polycarbonate. You want a polish that cuts predictably on both without aggressive solvents.
| Product type | Relative abrasiveness | Finish quality on glossy ABS | Risk level | Best use on Dyson |
|---|---|---|---|---|
| Novus No. 2 | Medium-fine | High, easy to refine | Low | Most scuffs on housing, light bin haze |
| Novus No. 3 (followed by No. 2) | Medium | Good if refined properly | Medium | Deeper scratches you can feel with a nail |
| Polywatch (watch crystal polish) | Fine | Good on small areas | Low to medium | Tight spots, small localized marks, clear plastics |
| Generic “plastic polish” | Varies wildly | Unpredictable | Medium | Only if you confirm it is plastic-safe, test first |
| Automotive cutting compound | Often too coarse | Can haze fast | High | Not recommended for most homeowners |
If you are restoring a clear bin that you want optically clean, Novus is usually the safer system because you can step through grades. Polywatch is handy for small zones, but it is slower for large surfaces.
Micro-Buffing Techniques (Hand vs Machine)
Section titled “Micro-Buffing Techniques (Hand vs Machine)”Buffing is just controlled abrasion and heat management. On a Dyson, the limiting factors are thin walls, curved panels, and the fact that you notice gloss inconsistencies immediately.
Hand vs machine buffing comparison
Section titled “Hand vs machine buffing comparison”| Method | Speed | Control | Heat risk | Best use |
|---|---|---|---|---|
| Hand buffing with microfiber | Slower | Excellent | Low | Most homeowners, tight curves, edges |
| Dual-action polisher with soft foam pad | Fast | Good | Medium | Large flat panels with heavy scuffing |
| Rotary buffer | Very fast | Poor for beginners | High | Avoid unless you know pad control |
If you machine-buff, use the lowest effective speed, keep the pad moving, and do not lean on edges. Check temperature with your fingertips often, if it feels warm, you are already close to softening that surface.
Cleaning the Clear Bin (Fixed and Expanded)
Section titled “Cleaning the Clear Bin (Fixed and Expanded)”Dyson clear bins and many shrouds are polycarbonate, not ABS. Polycarbonate scratches easier than ABS and it is sensitive to stress cracking and chemical crazing.
Safe cleaning process
Section titled “Safe cleaning process”Rinse loose dust first, so you are not grinding grit into the surface. Wash with warm water and a few drops of mild dish soap, using a clean microfiber or a soft sponge.
Rinse thoroughly and dry with a fresh microfiber towel. Air-drying is fine, but do not let hard-water spots bake on under heat, they can require extra rubbing later.
What to use for stubborn film and fingerprints
Section titled “What to use for stubborn film and fingerprints”Use Novus No. 1 for cleaning and anti-static protection, or a dedicated polycarbonate-safe cleaner. For sticky grime, 70% isopropyl alcohol on microfiber is usually safe in short contact, but do not soak seams or decals.
Avoid ammonia glass cleaner entirely. One wrong spray can create a permanent hazy, crazed patch that no polish will fully remove.
Dealing with scratches and interior cloudiness
Section titled “Dealing with scratches and interior cloudiness”Exterior scratches can often be reduced with Novus No. 2 using light pressure and even coverage. Interior “sandblasting” from debris is common and it is the hardest thing to reverse because the bin wall is thin and the scratched area is large.
If the bin is uniformly cloudy inside, you can improve it, but you rarely get it back to factory clarity without removing too much material. When clarity matters (client-facing work), replacement is often the smarter decision.
Cleaning tight curves without creating swirl marks
Section titled “Cleaning tight curves without creating swirl marks”Use a foam applicator pad or wrap microfiber around a soft, flexible tool handle to maintain even pressure on curves. Avoid paper towels, they can add fine scratches that show under kitchen lighting.
Static Electricity and Dust Buildup
Section titled “Static Electricity and Dust Buildup”ABS and polycarbonate hold static charge because they are insulators. Vacuuming generates triboelectric charge as dust moves through the airflow path, so the housing attracts dust right after you clean it; this same surface behavior is why people often look for advice on removing scuff marks from ABS plastic surfaces.
Wiping with a dry cloth can make it worse. To reduce static, apply anti-static spray to your cloth (not the machine), or wipe the exterior with a fresh dryer sheet after cleaning.
Humidity matters. In dry winter air, static is stronger and you will need anti-static control more often.
Real-World Results: What Restoration Can and Cannot Fix
Section titled “Real-World Results: What Restoration Can and Cannot Fix”Light paint transfer from a white baseboard on a dark ABS housing usually cleans off with isopropyl alcohol, then finishes out with Novus No. 2. That is a high-success job with minimal material removal.
Moderate scuffing with shallow scratches from repeated docking contact typically improves a lot with Novus No. 2, but you may still see faint marks at certain angles. The goal is uniform gloss, not chasing one last line until you burn through surface texture.
Deep gouges that catch a fingernail, especially on corners, can be softened but not erased without reshaping the plastic. You can reduce the visual contrast, but if you try for “invisible,” you usually create a wider low-gloss area that looks worse.
Polycarbonate bin haze from years of interior abrasion can be improved slightly, but full optical clarity is uncommon. If the bin looks frosted and you value appearance, replacement beats aggressive polishing.
Replacing Seals vs Polishing
Section titled “Replacing Seals vs Polishing”If suction is down, fix function first. A glossy housing does not matter if you are leaking air at seals.
Bin seals and wand seals take compression set. If you hear whistling, see dust escaping at joints, or notice a clear suction drop, replace seals before you do cosmetic work, since disassembly can scuff freshly polished panels.
Is Scuffed Plastic a Performance Issue
Section titled “Is Scuffed Plastic a Performance Issue”External scuffs do not change cleaning performance. Suction and filtration depend on the motor, cyclones, filters, airflow seals, and brush bar condition.
Cracks are different because they can leak air and allow fine dust into areas that should stay clean. Treat cracks as functional risk, not cosmetic annoyance.
Long-Term Scuff Prevention for Dyson Stick Vacuums
Section titled “Long-Term Scuff Prevention for Dyson Stick Vacuums”Prevention is cheaper than polishing because every polish step removes a microscopic layer. Your goal is to reduce contact, reduce grit, and reduce repeated rub at the same spot.
Store the vacuum so it cannot fall and so it does not rub while docking. If your mount forces a scrape on insertion, adjust position or add a thin sacrificial barrier where contact occurs.
Wipe down after use with a clean microfiber, then hit it with anti-static control so dust does not become abrasive on the next wipe—abrasion that can eventually lead to cosmetic damage and the need for repairing scratches and scuffs in ABS and PC plastics. Never use the same cloth you used on countertops or floors; grit contamination is a quiet finish killer.
If you want real protection, apply clear polyurethane paint-protection film to the high-wear zones. You replace the film later instead of cutting into the original plastic.
Cannibalization Note: Why This Guide Is Dyson-Specific
Section titled “Cannibalization Note: Why This Guide Is Dyson-Specific”Generic plastic scratch guides often assume flat acrylic panels, laptop shells, or automotive trim. Dyson housings combine glossy ABS, thin-wall clear polycarbonate, and high-contact handling patterns, so you need lower heat, more conservative abrasives, and better control on edges and curves.
If you are looking for broader plastic ID and behavior, start with Acrylonitrile butadiene styrene. For repair bonding rather than cosmetic polishing, the adhesive and prep considerations in ABS plastic are closer to what you need.
Cleaning the Cyclone Shroud
Section titled “Cleaning the Cyclone Shroud”Treat the shroud like the clear bin if it is transparent plastic. Use mild soap, water, microfiber, then dry fully.
For internal dust, use a soft brush attachment on another vacuum to pull debris out without scraping. Do not soak cyclone assemblies, trapped moisture can lead to odor and contamination in places you cannot reach.
Will Novus No. 2 remove the grey “rub marks” from walls?
Section titled “Will Novus No. 2 remove the grey “rub marks” from walls?”Usually yes, after you remove the transfer with mild soap or isopropyl alcohol. If it is true plastic deformation, No. 2 will reduce it, but you may not get a perfect disappearance on high-gloss panels.
Can I use a Magic Eraser just once, lightly?
Section titled “Can I use a Magic Eraser just once, lightly?”You can, but you are gambling with permanent dulling. If you do it, keep it wet, use almost no pressure, and expect the spot to look flatter than the surrounding gloss.
Is isopropyl alcohol safe on Dyson plastic?
Section titled “Is isopropyl alcohol safe on Dyson plastic?”On ABS housings, small amounts on microfiber are generally safe for transfer marks. On polycarbonate, quick wipes are usually fine, but avoid soaking seams, labels, and stressed corners.
Should I polish the whole vacuum or spot-treat?
Section titled “Should I polish the whole vacuum or spot-treat?”Spot-treat first, but blend outward. A small polished “island” can look different under light, so feather your work into the surrounding area for uniform gloss.
When should I stop and replace the part instead?
Section titled “When should I stop and replace the part instead?”Replace if you have a through-crack, a crack near a latch or load point, or a clear bin that is uniformly frosted from interior abrasion. If the goal is a like-new look and the plastic is already thin, replacement is often the cleanest win.
References
Section titled “References”-
SABIC Innovative Plastics. “ABS Properties and Processing Guidelines.” Technical documentation for impact-modified thermoplastic formulations.
-
Novus Plastic Polish. “Product Technical Information and Application Protocols.” Manufacturer guidance for plastic restoration products.
-
Dyson Engineering. “Vacuum Housing Materials and Design Considerations.” Internal design documentation.
-
Consumer Reports. “Stick Vacuum Reliability and Maintenance Survey Results.” Long-term durability testing and user experience data.
-
Journal of Applied Polymer Science. “Tribological Properties of ABS Composite Materials.” Research on scratch resistance and wear behavior.
-
University of Wisconsin Extension. “Plastic Identification and Properties for Consumer Applications.” Educational material on polymer characteristics.