Cleaning Cloudy Plastic Blender Jars - Verdict When the Jar Is Too Cloudy to Be Safe
📑 Table of Contents
Acidic ingredients and dishwasher heat chemically etch plastic, causing permanent cloudiness and crazing.
Routine cleaning with vinegar and dish soap vortex; Baking soda paste for deep stains.
Deep crazing, structural cracks near handle, or persistent hazing that traps bacteria.
This guide focuses on blender jars specifically, meaning high RPM abrasion, frequent acid exposure, and heat stress. If you are troubleshooting cloudiness on other items, start with our guide on identifying household plastics to match the right cleaning approach to the right material.
Polycarbonate vs. Tritan Jars
Section titled “Polycarbonate vs. Tritan Jars”Blender jars are typically manufactured from two primary types of plastic, each with different care needs. Older jars and some commercial units may still be polycarbonate, which is very impact-resistant and clear, but it can contain BPA and is more prone to certain kinds of chemical wear. Newer consumer blenders more often use Tritan (a BPA-free copolyester) that generally holds up better to detergents and temperature swings.
Both materials can turn cloudy, but the “why” matters because some cloudiness cleans off and some is permanent damage. Your goal is to tell the difference between removable films (mineral scale, grease, residue) and surface degradation (etching, crazing, scratches). That difference is what determines whether you should clean, keep using, or replace.
Can You Fix a Cloudy Plastic Blender Jar?
Section titled “Can You Fix a Cloudy Plastic Blender Jar?”- Yes, usually (5 to 25 minutes): mineral haze from hard water, oily film, and many food residues respond to vinegar, dish soap, and gentle scrubbing.
- Sometimes (10 to 30 minutes): mild staining and odors often improve with baking soda paste or a brief lemon wash.
- No, not fully (permanent): chemical etching, deep scratches, and crazing are physical damage, cleaning can improve hygiene but not restore clarity.
Cloudy vs. Dangerous: A 30-Second Safety Checklist
Section titled “Cloudy vs. Dangerous: A 30-Second Safety Checklist”- Keep using (clean and monitor): cloudiness wipes off when wet, feels smooth inside, no odor after cleaning, no visible cracks, no white “spiderweb” lines.
- Clean deeper before deciding: cloudy ring at the base, chalky haze that softens with vinegar, musty smell that seems to come from the gasket area.
- Replace now: crazing (fine crackle pattern), any structural crack near the handle or base, interior feels rough or sandpapery, persistent odor after full disassembly and cleaning, leaking around the blade assembly.
Why Smoothies Etch the Plastic
Section titled “Why Smoothies Etch the Plastic”One of the most common causes of permanent cloudiness in blender jars is the food you prepare in them. Acidic ingredients can slowly attack the plastic surface over time, leading to etching. Citrus, berries, and vinegar-based mixtures are frequent culprits because repeated low-pH exposure changes the surface finish.
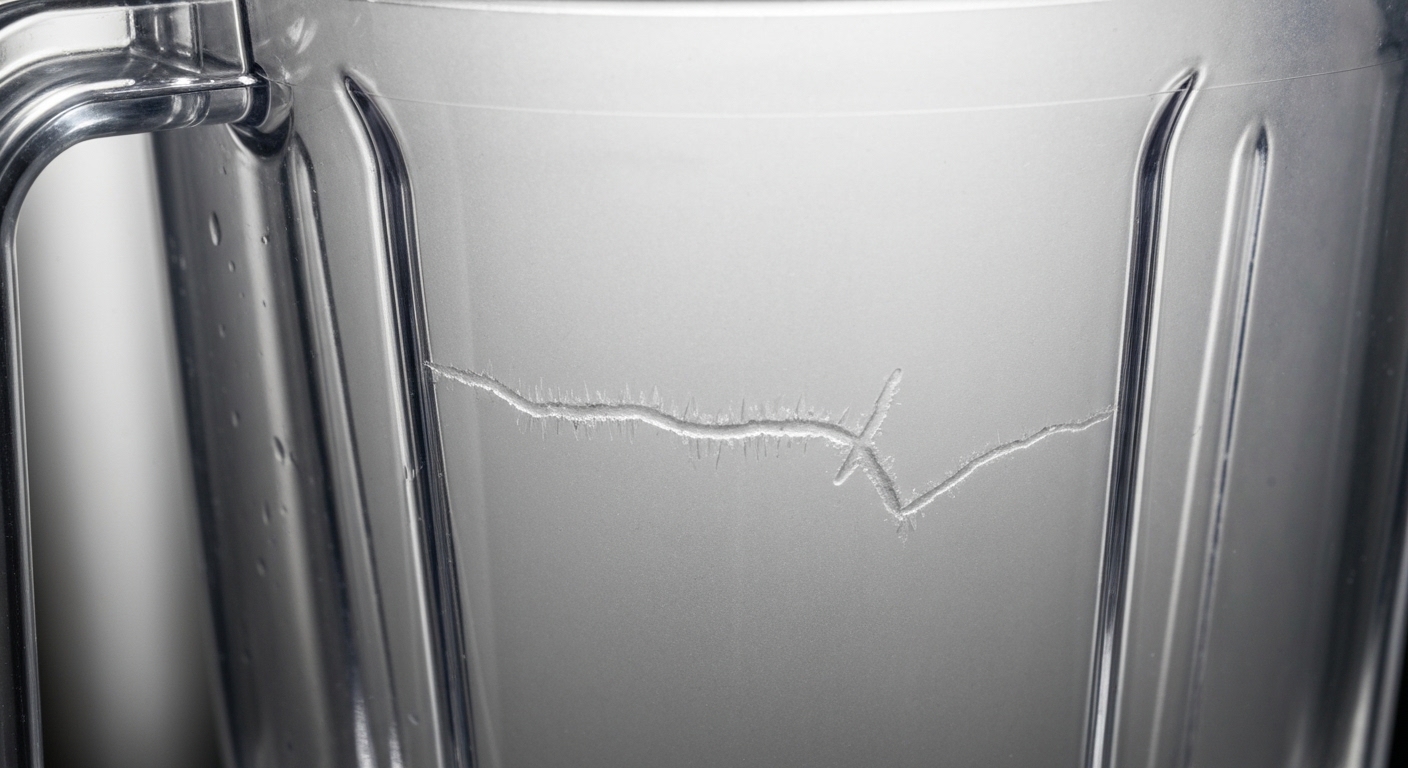
Etched plastic scatters light, so it looks cloudy even when it is clean. Etching is not a removable layer, it is a change to the surface itself. That new micro-texture can also hold onto oils and fine food particles, which makes the jar harder to truly degrease over time.
Cloudiness Causes and What Usually Works
Section titled “Cloudiness Causes and What Usually Works”| What it looks like | Most likely cause | Is it removable? | Best first fix |
|---|---|---|---|
| Chalky white film, especially near base | Hard water mineral scale | Often yes | Vinegar soak or wrap (15 to 20 minutes) |
| Cloudy “frosted” look everywhere, feels slightly rough | Acid etching | No (damage) | Improve cleaning routine, consider replacement if roughness is heavy |
| Glittery crackle pattern in the plastic | Dishwasher heat plus detergent (crazing) | No (damage) | Replace if widespread or if cracks are deep |
| Greasy haze that looks worse when dry | Oil and protein film | Yes | Dish soap vortex wash, hot rinse |
| Cloudiness plus musty odor | Mold in gasket or under blade assembly | Yes (if addressed early) | Disassemble, scrub, fully dry |
| Visible lines or gouges | Abrasion from dry grains, ice, aggressive scrubbing | No (damage) | Prevention, and replace if hygiene suffers |
Method: The Vinegar and Dish Soap Run
Section titled “Method: The Vinegar and Dish Soap Run”For routine cloudiness and day-to-day hygiene, this is the most useful method because it uses both chemistry and movement. Fill the jar about halfway with warm water, add a few drops of grease-cutting dish soap, then add a generous splash of white vinegar. Run low for 30 seconds, then high for 30 seconds so the vortex pushes solution into corners and under the rim.
Rinse thoroughly and air dry with the lid off. If the jar still feels slick, repeat with slightly hotter water (not boiling) and a bit more soap rather than more vinegar. Vinegar is great for minerals, but soap is what reliably lifts fats and emulsified residue.
Removing Hard Water Scale from the Base
Section titled “Removing Hard Water Scale from the Base”Mineral deposits from tap water often create a white or gray haze, especially around the base where water lingers. The haze usually feels smooth and chalky rather than rough and scratchy. This is one of the easiest “cloudy jar” problems to actually fix.
Soak the affected area in straight white vinegar, or wrap it with a vinegar-dampened cloth for 15 to 20 minutes. Scrub gently with a soft sponge or cloth, then rinse well. Dry the jar right away to reduce new spotting, and consider a distilled-water final rinse if your water is very hard.
The Blade Gasket Mold Problem
Section titled “The Blade Gasket Mold Problem”The rubber gasket sealing the blade assembly is a common hidden source of odor and recurring cloudiness. Food particles and moisture can collect in the groove between the gasket, blade unit, and jar. That damp pocket is enough to support mold, even if the jar itself looks clean.
Disassemble the blade unit per your manufacturer instructions, remove the gasket, and scrub all parts with hot soapy water and a small brush. Rinse, then dry each piece completely before reassembly. If the gasket stays stained, smells musty after cleaning, or feels sticky, replacement is a low-waste fix compared to replacing the whole jar.
Why Dishwashers Cause the Jar to Crazing
Section titled “Why Dishwashers Cause the Jar to Crazing”Dishwasher damage is usually a mix of heat stress and detergent chemistry, and it adds up faster than most people expect. Typical dishwasher wash water is often around 50 to 70°C (122 to 158°F), and heated dry cycles can push hotter air across the plastic for an extended time. Even if a jar is labeled “top rack safe,” the repeated heat cycling can still fatigue the plastic over months of use.
Detergent is the other half of the problem. Many automatic dishwasher detergents are strongly alkaline, which helps remove grease, but alkalinity can also accelerate stress cracking and surface degradation in certain plastics. Combine alkalinity, heat, and powerful spray pressure, and you get crazing, which is a network of microcracks that makes the jar look permanently glittery or frosted.
“Top rack safe” often means the jar will not warp dramatically in a few cycles, not that it will stay clear and smooth for years. If clarity and lifespan matter, hand washing in moderate-temperature water with mild dish soap is the gentlest long-term approach. For the broader science behind those labels, see dishwasher safe plastic science.
The Baking Soda Deep Scrub
Section titled “The Baking Soda Deep Scrub”If vinegar and soap remove grease and minerals but you still have cloudy patches from stubborn residue, baking soda is a safe next step. Make a thick paste with water, apply it to the cloudy areas, then scrub gently with a microfiber cloth or a soft brush. Baking soda is a mild abrasive, so it can lift films without the aggressive scratching you get from harsher scouring powders.
Rinse very well after scrubbing. Dried baking soda can leave a white residue that looks like cloudiness, so a thorough rinse and towel dry helps you judge the real result.
The Eggshell Cleaning Hack (Myth vs. Fact)
Section titled “The Eggshell Cleaning Hack (Myth vs. Fact)”Crushed eggshells can act as a mild abrasive when blended with water and a drop of soap. That action can help knock loose residue or light mineral film, especially in textured areas near the bottom. It is also a low-waste option if you already have eggshells headed for compost.
It will not reverse etching, remove deep scratches, or fix dishwasher crazing. If your jar still looks frosted immediately after a good soap-and-vinegar wash, eggshells will not restore clarity because the plastic itself has changed.
The Lemon Juice Odor Removal
Section titled “The Lemon Juice Odor Removal”For lingering odors, blend lemon juice with water for about a minute, then rinse thoroughly. The citric acid can help neutralize odor-causing residues, and the fresh scent makes it easier to tell whether the odor is truly gone or just masked by detergent—an approach often recommended when cleaning cloudy plastic pitchers and jugs. Use this occasionally, not daily, because frequent acid contact can contribute to etching over the long run.
If odors come back quickly, check the gasket and blade assembly first. Persistent smells are more often trapped in seals and micro-texture than in the open jar wall.
Best Cleaning Products for Plastic Blender Jars (Compared)
Section titled “Best Cleaning Products for Plastic Blender Jars (Compared)”| Product type | Best for | Effectiveness on cloudiness | Risk to jar | Notes |
|---|---|---|---|---|
| White vinegar (5% acetic acid) | Mineral scale, light haze, deodorizing | Medium to high (for minerals) | Low | Avoid long soaks on already-etched interiors, rinse well |
| Baking soda paste | Stubborn films, light staining | Medium | Low to medium | Gentle abrasive, do not use with aggressive pads |
| Commercial descaler (citric or sulfamic acid based) | Heavy mineral scale in hard water areas | High (for minerals) | Medium | Follow label dilution, avoid mixing with bleach, rinse repeatedly |
| Plastic-safe cleaner (mild dish soap or non-abrasive kitchen cleaner) | Oils, proteins, routine hygiene | High (for residue) | Low | Often the best “first fix,” especially for greasy haze |
Polishing the Outside vs. the Inside
Section titled “Polishing the Outside vs. the Inside”Polishing is where many people accidentally trade “clearer” for “less safe,” so it helps to be strict about where products go. The outside of the jar is not food-contact, so plastic polishes can be appropriate there for cosmetic scratch reduction. The inside is food-contact and also gets abraded at high speed during blending, which means residues matter more.
| Product or method | Outside of jar | Inside of jar (food-contact) | Why |
|---|---|---|---|
| Plastic polish (for example Novus-style systems) | Yes | No | Not designed to be food-safe, residue can persist in micro-scratches |
| Baking soda paste with soft cloth | Yes | Yes | Mild abrasive that rinses away fully when used gently |
| Magic eraser style melamine foam | No (best avoided) | No | Acts like very fine sandpaper, increases micro-scratching |
| Abrasive powders, scouring pads, steel wool | No | No | Creates permanent scratches that trap residue and microbes |
| Dish soap plus microfiber or soft sponge | Yes | Yes | Lowest-risk routine approach |
If you feel tempted to “buff out” the inside, pause and check the texture with clean fingertips. If it feels rough or etched, polishing rarely restores it, and it can make the surface even more micro-scratched.
Common Mistakes That Permanently Ruin Blender Jars
Section titled “Common Mistakes That Permanently Ruin Blender Jars”Bleach is a frequent overcorrection for odors and mold. It can accelerate stress cracking in some plastics and can degrade rubber gaskets, which then leak or hold odors even more. If you need disinfection for food equipment, focus on thorough washing, full drying, and replacing worn seals.
Dishwasher heat and alkaline detergent are a second big culprit. Even without visible warping, repeated cycles can cause haze, loss of gloss, and crazing that you cannot reverse.
Magic erasers, harsh scrub pads, and abrasive powders also do long-term damage. They can “seem” like they work because they remove a top film quickly, but they replace it with scratches that hold onto the next round of residue. Aggressive abrasives are one of the fastest ways to turn a clear jar permanently frosted.
Identifying Stress Cracks near the Handle
Section titled “Identifying Stress Cracks near the Handle”Cracks at the handle attachment point are a structural red flag. That area takes concentrated stress every time you lift and pour, especially when the jar is full. If a crack is visible there, the plastic has already lost strength where you need it most.
Treat handle-area cracks as a replacement trigger. A handle failure with hot soup or a heavy smoothie can cause burns and injuries, and it is not worth stretching the jar’s life past that point.
Why Dry Grains Scratch the Jar Faster
Section titled “Why Dry Grains Scratch the Jar Faster”Hard, dry ingredients like coffee beans, whole spices, and dry grains become high-speed projectiles during blending. They impact the walls and create scratches quickly, sometimes within only a few uses. Those scratches are permanent and they are also “grabby,” meaning oils and fine powders cling more readily afterward.
For prevention, add liquid before or with hard ingredients whenever possible. If you regularly mill dry ingredients, a dedicated grinder jar (often smaller and replaceable) reduces wear on your main blender container.
Can Cloudy Plastic Leach Chemicals?
Section titled “Can Cloudy Plastic Leach Chemicals?”Most cloudiness is not automatically a chemical leaching problem, but certain kinds of damage do raise the risk. Older polycarbonate jars may contain BPA, while Tritan is typically BPA-free, and both materials are designed for repeated food contact under normal use. The bigger concern is that surface damage (scratches, etching, crazing) increases surface area and creates microcracks where residues cling and where wear can accelerate.
Leaching risk tends to rise with heat, harsh detergents, and degradation over time. Running very hot dishwasher cycles, using caustic cleaners, or blending very hot liquids repeatedly can stress plastic and speed up aging. If you want a deeper safety overview for plastics used with food and beverages, our guide on food safety covers what actually changes risk in a home kitchen.
Cloudiness alone is usually a usability and hygiene signal, not proof of chemical release; for a deeper explanation of how this differs from structural damage, see Vitamix container clouding vs crazing. If cloudiness is paired with rough texture, crazing, cracking, or persistent odor that will not resolve after a gasket-level clean, replacement is the safer call.
Verdict: When the Jar Is Too Cloudy to Be Safe
Section titled “Verdict: When the Jar Is Too Cloudy to Be Safe”Some cloudiness is purely cosmetic, especially if it is mineral haze that softens with vinegar or a greasy film that disappears when wet. The safety line is crossed when cloudiness comes from surface damage that creates hiding places you cannot reliably clean, or when the jar has structural weaknesses that could fail during lifting or blending.
Use the table below as the deciding tool, because “cloudy” is not a single condition. A smooth jar that looks a bit dull can still be safe, while a jar that looks only mildly hazy can be a hygiene problem if the interior feels rough and holds odor.
| Condition | What it means | Hygiene risk | Structural risk | Keep, clean, or replace |
|---|---|---|---|---|
| Smooth cloudy film that improves with vinegar | Mineral scale | Low | Low | Clean and keep |
| Smooth greasy haze that improves with soap | Residue buildup | Low to medium | Low | Clean and keep |
| Persistent musty smell, visible grime under blade unit | Gasket or assembly contamination | High until cleaned | Low | Disassemble and clean, replace gasket if needed |
| Interior feels rough or sandpapery, looks frosted even when wet | Etching and micro-wear | Medium to high | Low | Keep only if you can clean it well and it does not hold odor, otherwise replace |
| Fine spiderweb pattern, glittery look, worsens over time | Crazing from heat and detergent | High (traps residue) | Medium (cracks can propagate) | Replace if widespread, or if you can feel texture changes |
| Any crack near handle, base, or threaded areas | Structural cracking | High (difficult to sanitize) | High | Replace now |
| Leaks around blade base despite gasket cleaning | Seal failure or warped parts | Medium | Medium to high | Replace gasket or jar assembly, stop using until fixed |
If you are on the fence, do two quick checks after a full clean and dry—steps you might already be taking if you’re trying to fix a cloudy water reservoir. First, run a fingertip around the inside and feel for roughness, because roughness is what holds residue. Second, fill with water and check for weeping at the base and handle area, because small cracks often reveal themselves under load.
Replacing a jar is not a failure, it is normal wear management for a high-stress kitchen tool. If you replace, keep the old jar out of the trash if possible by checking local rigid-plastic recycling rules or manufacturer take-back programs, and save the lid and gasket only if they are still in good condition.
📚 References & Sources
- Vitamix Corporation. “Container Care Guide.” Manufacturer guidance on cleaning and maintaining Tritan containers.
- Society of Plastics Engineers. “Tritan Properties.” Technical data sheet detailing the chemical resistance and impact strength of copolyesters.
- NSF International. “Food Equipment Materials Standards.” Standards for materials used in commercial food service equipment.
- Extension Services. “Kitchen Equipment Care.” Educational resources on maintaining food safety with kitchen appliances.
- Consumer Reports. “Blender Testing and Care.” Consumer product testing results and maintenance advice.